
INSTALLING AN OUTSIDE TAP
- By nicky hopwood
- •
- 03 Jul, 2017
- •
This is a subtitle for your new post
Putting in an outside tap is often considered more trouble than it’s worth and as our winters get colder many would rather put up with the inconvenience of using internal hose connectors and connecting to the kitchen sink rather than risk frozen pipe work.
Before you start there are a few tools you might need. I have put a list together for you.
Pliers , power drill , outside tap kit , bucket , ptfe tape , pipe cutters , adjustable spanner , small and large drill bits , plugs and screws.
1: First of all you will need to know how to turn off the water supply. Try and locate your main stop tap. This is normally under the kitchen sink or wherever the mains supply enters the property.
If you cannot find the stopcock, you may be able to turn off the water at the main stop tap outside in the path the water authority’s valve . You’ll need a special long-handled spanner, available from plumbers’ merchants.
Once the water supply is turned off, open the cold tap on your sink until the water stops running. It is also a good idea to go upstairs and open the cold tap up there as well.
2: Get out the outside tap kit and see what size you need the hole to be. then get a drill bit out about 2mm bigger and fix it into your drill. Then drill a hole through your external wall.
Please be careful when drilling. the hole should be at least 400mm from the floor and at least 300mm above the damp proof course.
When drilling, make sure the hole is wide enough to take the 15mm size of the pipe’.
Steadily drill through the wall with a heavy duty power drill and a large masonry bit at least 330mm long.
Remove the drill bit regularly to clear the loosened masonry.
then mark the wall for where the holes need to be to fix the outside tap.
3: Pipe work for the outdoor tap
making sure the water supply is turned off, cut through the cold water pipe directly above the exit hole you have drilled in the wall. Use a hacksaw or pipe cutter to do this and file the ends of the pipes smooth.
Remove enough pipe to fit a 15mm T connector.
Connect one end of a short bit of pipe to the T-piece and the other end to an Isolation Valve so that the water supply to the new tap may be turned off when required in the future .
FITTING AN ISOLATION VALVE
Isolation Valves allow you to turn the water off to an individual appliance without having to turn off the whole water supply.
Make sure you fit the valve the correct way around otherwise it won’t work correctly. There is an arrow on the valve indicating the direction of the flow of water.
There are two types: a ‘Push-fit’, which simply pushes into the ends of the pipes, and a ‘Compression’ which we show how to fit here.
Having turned off the water supply, mark the section of pipe that needs removing to receive the valve.
Cut the section from the pipe with either a pipe slice or hack saw and file the ends of the pipes smooth.
Now slide a compression nut onto each piece of pipe followed by the olives .
Push each end of the pipe into the fitting and tighten the compression nuts by hand.
Use a pair of pliers to hold the body of the valve and tighten the compression nuts about 3/4 of a turn.
When you turn on the water supply once more, check for leaks – if necessary tighten the compression nuts a little further.
Next you need another short piece of pipe which connects the Isolation Valve to a Double Check Valve.
DOUBLE CHECK VALVES
Water regulations specify that you must fit a Double Check Valve to your outside tap pipe work.
Double Check Valves stop water flowing back up a pipe the wrong way. This prevents contaminated water entering the drinking water supply in your home.
For a new external tap the valve must be fitted in your internal pipe work, after the Isolation Valve.
Double Check Valves are fitted in a similar way to Isolation Valves – see ‘Fitting an Isolation Valve’ above.
If you have an existing external tap you may replace it with a tap that already incorporates a Double Check Valve.
After fitting the Double Check Valve insert another short piece of pipe and an elbow (. Then fit a length of pipe long enough to reach horizontally through the wall to the outside. When through the wall, cut the pipe to leave about 25mm protruding.
Finally you will need to cut a piece of pipe that reaches from the horizontal pipe protruding from your outside wall down to the position of your tap.
These pipes are connected using another elbow joint.
Connect all the parts together and tighten the joints with two adjustable spanners. If any joints leak when the water supply is turned back on they can be tightened further, but do not over-tighten.
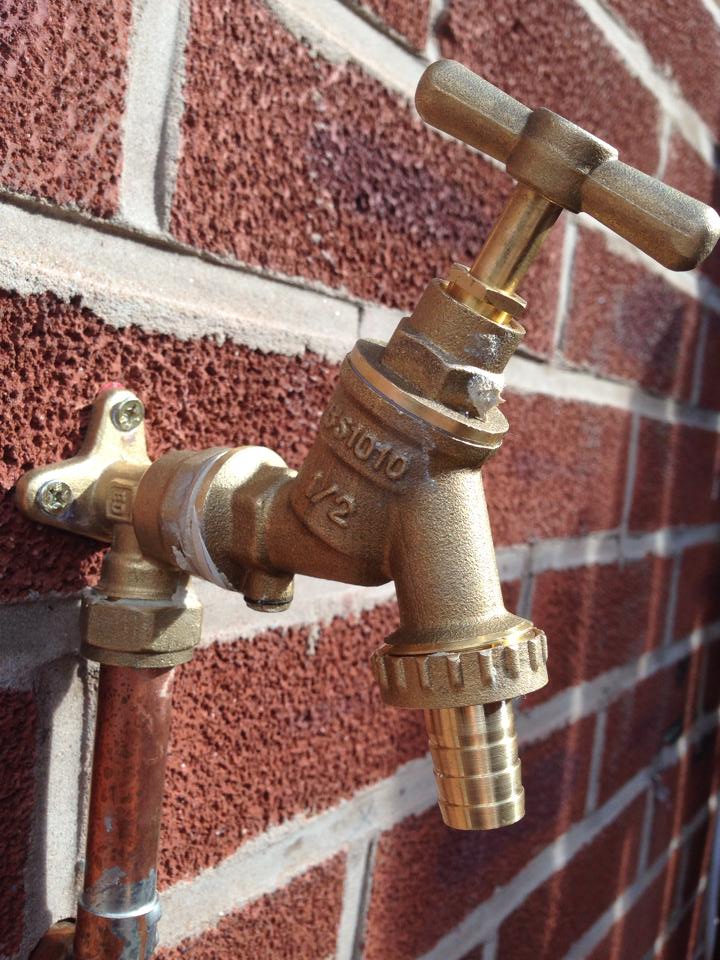
4: Attaching the new outdoor tap
Drill the fixings holes for the tap’s wall plate, insert plugs and screw the tap plate to the wall. Screw the tap tail into the elbow join.
Use plastic retaining clips for the pipes on the inside wall to stop the pipes vibrating and knocking against the wall.
Seal around the pipe hole in the wall with an expanding foam filler or sealant.
Finally, turn the water supply back on and check for any leaks.
Tighten any joints as necessary and then you’re ready to go.
If you do not want to install a outside tap yourself and you live in the Leeds area we will install it for you
If you would like a full quote call Dave on 07830 262487

ECO HEAT PLUMBING AND HEATING - 25kw A rated condensing combination boiler complete with time clock. 5 years manufacturer warranty. Price to include all parts and labour £1100 including VAT, subject to survey. Call Dave 07830 262487
Installing an outside tap on your property is a really useful project for a number of reasons, the most popular reasons include making it easier to wash your car or water the lawn. This is a project that is possible on a DIY basis if you have the right skills, experience and tools. However, if you don’t want to do this job yourself, please contact Dave at Eco Heat Plumbing and Heating
Most outside taps are installed using a kit which is available from many DIY stores which connects to the domestic cold water supply under the sink, but it’s not too difficult you can make up your own cold water supply connection using the traditional copper pipe method. The copper pipe method involves using a T-fitting to branch off the cold water supply, then inserting a pipe through the wall then fitting a new tap. To begin, choose the most suitable cold tap in your home (i.e. one which has enough space to insert a T-connector and is close to the planned outside tap position). This will normally be either the kitchen or bathroom sink.
The cold water supply pipe will have to be cut to allow the insertion of the T-fitting needed to branch off the supply. This is best done using a pipe slice or pipe cutter, avoid using a hack-saw if possible and this leaves the pipe edges really rough and hard to seal. If a hacksaw is used you will need to spend some time de-burring the end of the pipe – better to use the correct tool in the first place!
Once the pipe is cut, insert the T-piece into the pipe to provide a supply to the outside tap. It is best to also fit an isolation valve which will allow you to turn off the supply to the outside tap if required. Once the isolation valve is fitted and tightened up, the water can be turned back on. From the isolation valve it is also useful to fit a drain cock that allows you to drain down the outside tap pipework to avoid freezing pipes in the winter. Then run the pipe to the wall to a 22mm drilled hole (you will need a hammer drill and a 22mm masonry bit. Insert a piece of 22mm copper pipe as a sleeve then run the water pipe through the sleeve to connect to the tap.
The outside tap will consist of a backplate and the tap mechanism itself, fit the back plate to the wall and screw the tap into the back plate. The gap between the sleeve and the actual water pipe can now be filled with silicone mastic to keep it water tight and you can add an insulated cover or jacket to prevent it freezing in winter.

In most peoples’ opinion we are at the end of summer and now headlong into winter! For most there was not really a lot of summer to talk about and apart from some odd days it all seems to be as usual over very quickly.
The leaves falling of the trees and getting blown about by the ever increasing wind definitely is making things colder and unless you live in a completely airtight house you will have probably turned on your heating already.
We do not like to be doom and gloom and a bandwagon chaser, as we are always extremely busy throughout the whole year but there is definitely a necessity to check your heating and hot water now.
Yes we have a vested interest and yes we could help but it is a lot easier to sell a boiler or radiator to someone who is not in a rush and makes a rational decision.
We are not saying that our customers are irrational all the time but the fear of no hot water or heating is an emergency in most cases. We all take our central heating for granted and it is not nice when a necessary comfort is lost.
What checks will help keep your house warm?
So this is why it is very sensible to get your heating and hot water system checked or serviced. There are some visual checks that you can do mentioned in previous blogs. Checking a boiler before it goes wrong is better than trying to diagnose what is wrong with a dead one.
The best way to keep your house warm this winter is to get the heating checked over and make sure all the radiators are getting hot. Insulation has been a topic for many years now but it does still make a massive difference to heat loss.
Making sure that your windows close properly and any draft excluders are fitted is a good way to keep out the wind chill, which makes your comfort temperature drop.
Annoying drafts make you feel cold and reduce the temperature in the room and are easily solved. You can also fit a thermostat that takes learnings from your habits and the external weather data to make sure you are always at the right temperature. For all your plumbing, gas and boiler requirements phone Dave at Eco Heat Plumbing & Heating
Most of us have our boiler switched off throughout the whole summer period, dependant on the lovely British weather of course, but even if you’re tempted, it’s probably not the best idea to turn it back on to full power when it gets a bit colder.
Your boiler builds up a lot of dust and grit as it sits unused throughout the summer and shocking the system by putting it on full blast, after months of inactivity, is a sure-fire way to result in heartache and unneeded stress. Get your boiler serviced before the winter sets in
Turning your boiler on even once or twice a month – in the months leading up to the cold snap – can help you avoid having issues when you’ll rely on it most. Another benefit of doing this is that it will highlight any issues with the boiler before you need it the most (in winter), giving you a chance to save or get any necessary repairs or replacements sorted in good time.
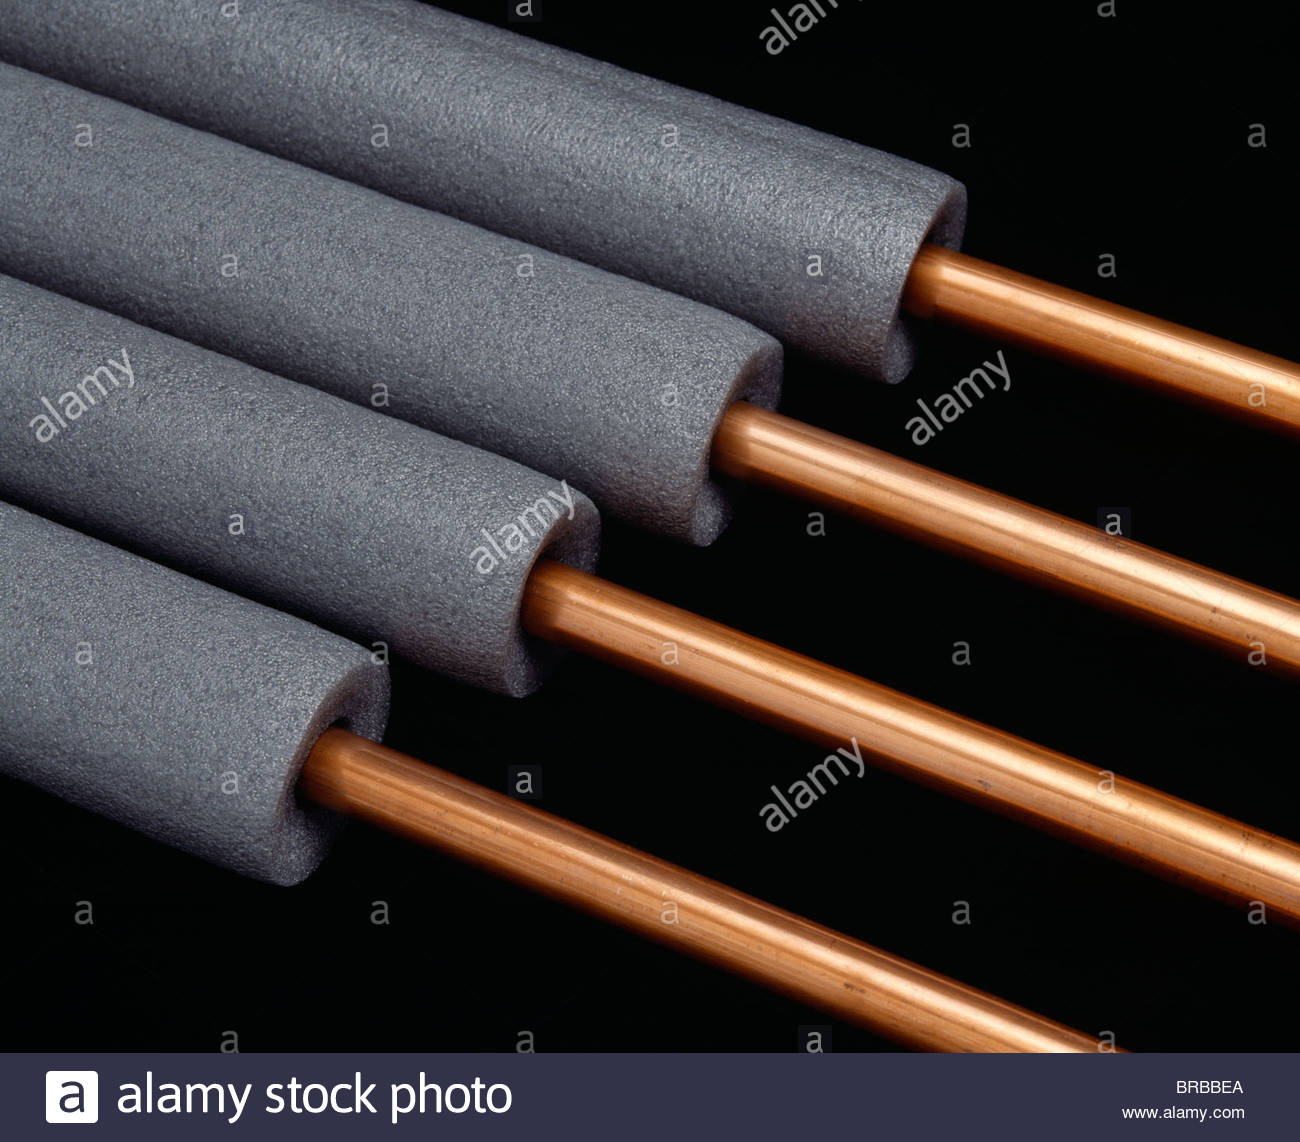
Pipe lagging keeps the heat flowing
When the temperature drops, pipes can freeze. Not only does this stop your central heating working properly, it can mean replacing burst pipes. The simple solution is pipe lagging. You can buy ready-made lagging that slips on in minutes, yet gives years of protection.

GET YOUR APPLIANCES CHECKED
Don’t leave it to chance – unchecked appliances could pose a risk to you and your family
All gas appliances in your property need to be safety checked by a Gas Safe registered engineer annually and serviced according to manufacturer’s instructions. Any appliance left unchecked could leave you at risk of carbon monoxide poisoning. It’s an extremely good idea to have your gas pipework inspected at the same time as having a gas safety check, every year – and it’s law if you’re a landlord.
Sign up to our free reminder service at StayGasSafe.co.uk to get an email or text each year so you don't forget.
Servicing
If you notice any of the following warning signs, you’ll want to get your appliance serviced right away:
- The gas appliance is not working properly
- The appliance is burning with a lazy yellow flame rather than a crisp blue one
- Black marks/stains are evident around the gas appliance
- The pilot light keeps going out
- There is increased condensation in the room
What’s the difference between a safety check and a service?
Prior to any work being carried out it is important to agree with your registered engineer their scope of the work so that everyone is clear. For example, there are differences between an appliance service and a safety check and equally between a safety check of appliances and a safety check of the whole installation, which includes all pipework and appliances.
What is an Appliance Safety Check?
An appliance safety check at a minimum includes all of the checks and tests to ensure the appliance is safe to operate, for example:
- It is correctly set and adjusted to ensure the gas is burning correctly
- It is of a type suitable for the room in which it is located
- It is physically stable, securely fitted and properly connected to the gas pipework
- There is an adequate and permanent air supply suitable for the appliance type installed
- Any flues or chimneys are operating correctly
- All safety devices function correctly
What is an Appliance Service?
An appliance service will include all of the above checks and tests and any other specific checks, for inspection and/or cleaning of the appliance as specified and detailed in the appliance manufacturer’s instructions. This may include:
- If appropriate, an analysis of the combustion exhaust gases to ensure the appliance is burning the gas safely
- A check of the condition of the appliance including (but not limited to): the effectiveness of any seals, gaskets, the cleanliness of heat exchangers etc. and checking for any signs of heat or other distress
This is not an exhaustive list and servicing requirements will vary across appliance types and models.
Note: Some appliance servicing regimes provide an interim performance check (annual) to be used in order to determine the degree of dismantling the appliance and the level of servicing required.
What is a Gas Installation Safety check?
If a gas installation safety check (all appliances and internal pipework) is required or specified each appliance will need to be checked as outlined above and additionally:
- All accessible gas pipework is visually inspected to ensure the installation is in good condition, and;
- The gas pipework is tested to ensure there are no gas leaks
During and after the engineer’s visit
When assessing an unsafe gas appliance, all engineers will follow the Gas Industry Unsafe Situations Procedure (GIUSP) which provides ‘best practice’ advice to engineers on how to deal with specific gas safety concerns.
After they have worked on the appliance, the engineer may issue you with a report detailing the checks they’ve carried out. This could be a Gas Safety Record, depending on what work they have done – however it's not a legal requirement for this to be issued, so it’s probably best to check with the business beforehand what documentation they’re likely to provide.
Flues, chimneys and air vents
These all play an important role in the safe operation of gas appliances, allowing products of combustion to escape and ensuring a high level of ventilation. As cold as it might get during winter, never block up these airways – this could result in a build up of carbon monoxide in your home.
Chimneys will need to be checked every year for blockages (such as birds’ nests and debris) which can prevent dangerous fumes from escaping. The Gas Safe registered engineer will be on the lookout for these.
If you live in a property with a shared flue or chimney, you’ll need to share responsibility with others to ensure they are checked annually as it’s possible for carbon monoxide to enter properties through these shared vents.
We often read reports about CO (carbon monoxide) poisoning in the press, but it only really hits home when it happens to those close to you.
A friend of Eco Heat Plumbing and Heating recently had a close call when they heard a beeping noise coming from a CO alarm in their home. They had totally forgotten it was there, sat on top of a cupboard, but it probably saved their lives.
When they heard the beeping the immediately called the number on the back of the alarm. An engineer came to visit their home and reported that their cooker was leaking high levels of carbon monoxide in their home. Without the alarm the outcome could have been fatal.
With prices starting at £10 for an alarm, there really isn’t any reason why you shouldn’t have one in your home. It’s also very easy to confuse CO poisoning with the flu, so make sure you are aware of the following signs:
- Headaches
- Nausea
- Dizziness
- Breathlessness
- Collapsing
- Passing out
If you smell gas or think there might be a leak:
- TURN OFF THE GAS AT THE METER
- EXTINGUISH NAKED FLAMES
- OPEN THE WINDOWS
- LEAVE THE AREA
- SEEK MEDICAL ADVICE IF YOU FEEL UNWELL
Eco Heat Plumbing and Heating are proud to be members of the Gas Safe Register. If you would like to find out more about their work visit www.gassaferegister.co.uk.
We may live in a throwaway society – you’ll find perfectly serviceable TVs, PCs and home furnishings junked at your local council recycling point – but few of us would consider trading in the family car because it needed an oil change or an MOT. We might exchange it when a repair bill is going to cost us more than its resale value, but on the whole we consider regular servicing and maintenance of our vehicles a good investment.
It’s strange then that, by and large, few take the same view of their boiler and central heating system. Eco Heat's customers are the obvious exception, but the general view, regrettably, is to fit it and forget it until its silts up or breaks down – and then replace it!
If you’re an eccentric millionaire, fine. But you’ve only got to do the calculations to realise that it doesn’t add up. A new boiler, typically, will cost you in the region of £1,500. An annual service to keep it in good running order will only cost you around £65, giving your system a working lifetime of between 15 and 35 years, as opposed to as little or two or three if you leave it unattended.
Nor is it just a matter of longevity or cost saving. An un-serviced boiler is an inefficient boiler, which makes a hot bath or shower on demand a rare luxury. Worse still, it could become dangerous: every year around 4000 people go to A&E with carbon monoxide poisoning due to leaking boilers.
Prevention is better than cure, and if conducted on a regular basis is relatively quick, simple and economical. The three golden rules we follow in the business are ‘Clean, Protect & Maintain’.
At Eco Heat our after sales service begins immediately after boilers and central heating systems are installed. We flush the system through – with mains or power pressure flushing as necessary, to clear any residue that may have accumulated during manufacture or installation.
Cleaning
The biggest problem with boiler and central heating systems is, ironically, the easiest to cure. And that, believe it or not, is: sludge, the accumulated silt and metallic particles that settles in tanks and pipework. Clearing it is the first procedure we undertake in all service calls.
Protection
Preventive maintenance is the most cost effective, so next we top up the system with a chemical inhibitor that helps prevent corrosion or the build-up of limescale. Filtration devices are now also available for this purpose.
Maintenance
This is not, of course, a one off treatment. The concentration of the inhibitor needs to be checked and maintained at regular intervals, and the annual service is the ideal time to do this.
Water is an essential part of life. Yet, we still take it for granted. Because it covers 70% of the earth we have the illusion that it is limitless. In today’s environment, water is a precious commodity that needs to be conserved.
Plumbers know and understand this, and spend a great deal of time doing just that, by finding and correcting leaks.
Watering Your Garden
The afternoon is never a good time to water the lawn. Choose the morning or evening hours, when the outdoors is cooler and the water can soak into the ground.
Dishwasher is a Must
Need an excuse to have a new dishwasher installed? Energy star rated models can now use as little as 3 gallons of water to get those dishes clean again. Washing by hand can use up to 27 gallons of water.
Wash that Car
Automatic car washes are now capable of using only 40 gallons of water. Compare that to the amount of water used in the driveway with the hose.
Rain Barrel
Want to go green? Put a rain barrel under that gutter and reuse the water for your garden.
Bath Time.
You can never truly compare a shower to a bath. That’s like comparing apples to orange. They just aren’t the same. Just remember that the average tub can take between 30-50 gallons of hot water to fill, compared to the average shower of 20 gallons. And if you’re ready to u
pgrade your shower head
you can lower that amount even more.
Choosing the best smart thermostat for your home will not only save you money but will also reduce your carbon footprint.
There are a variety of smart thermostats on the market today and choosing the best one for your home and heating system is essential if you want your central heating system to operate as efficiently as possible.
The latest smart thermostats are a vast improvement on the conventional, and outdated, way of adjusting heat and air conditioning in your home. Different smart thermostat models can do different things, but all of them are focused on their basic purpose of is heating and cooling your home more efficiently.
If you’ve got an internet connection, some can be controlled from anywhere. Some can learn your preferences and set them for you. With a variety of features each smart thermostat is unique, with all their significant merits.
Want to upgrade your house with a smart thermostat? We have reviewed Five Best Smart Thermostats on the market today.
1. NEST LEARNING THERMOSTAT
The most well-known and, in our opinion, best smart thermostat is Nest. It’s sleek aesthetic, excellent features and ease of use are the primary make the Nest our preferred choice and the unit we are most likely to recommend to our customers.
Why is Nest the best smart thermostat?:
- Easy to use
- Relative affordability
- Innovative ability to self-program
This smart device can actually learn and remember, when you want your home temperature raised and lowered, and then takes over the job.
Moreover, it’s compatible with all sorts of other apps and systems used in your home, for exampleBig Ass Fans, August Locks, and even Mercedes-Benz automobiles. Unfortunately, however, Nest cannot work withApple Home Kit.
The second generation of the Nest Learning Thermostat will cost you £249, including professional installation. (£179 without installation).
Features:
- Auto-schedule and auto-away functionality, as well as True Radiant
- Learns how your home heats and cools so it can be at the right temperature at the right time
- Access through your corresponding app to change schedule.
- Attractive, minimalist design that coordinates with any home’s decor
- The whole set-up is easy to use.
The biggest weakness of Nest Thermostat is that,as it has no external sensors, it’s hard to keep temperatures steady, if your home heats and cools unevenly in different rooms.
2. HIVE ACTIVE HEATING 2
Hive Active Heating is a v2.0 of a product by British Gas,available only in the UK. Though the price approaches the high end of the range at £249. However, an upgrade from the older first version, is just £99.
Features:
- Can be easily adjusted from anywhere with the corresponding app or web tool.
- Has just a few buttons and a dial to control an LED display.
- No touchscreen, but has an attractive interface is easy enough to use without that type of interaction.
- It’s got geofencing, the enables you to set a home and an away temperature, totally dependent on your location.
- The app can also notify you if the heat is mistakenly turned up with no one at home.
- Frost protection to keep pipes from freezing
- Includes holiday mode to keep the temperature low for an extended period of time
- Can also work with your water heater to make that more efficient too.
There’s no learning capability, which may be a drawback, though it is easy enough to change the temperature if you remember to do so. Hive2 can also support zone heating, but only if the radiators are already set up that way.
3. ECOBEE3 SMART THERMOSTA T
A little less known than Nest, Ecobee3 smart thermostat is very similar to Nest. Priced almost £100 less than the Nest, the Ecobee3 offers some significant advantages over its more popular counterpart.
Features:
- Sophisticated interface that gives you temperature controls, shows weather and more with just a few taps.
- Starter kit comes with one external temperature sensor, you can also purchase others to add to your configuration
- Can be controlled via smartphone app
- Smart and compact design
Although, it has some user gripes about the app’s instability, plus, it needs a lot of power to run. Also, has problems with older homes with older wiring.
Ecobee3 smart thermostat is a great system to use in larger and newer homes and surprisingly it’s very affordable.
4. TADO SMART THERMOSTAT
The unique selling point of Tado Smart is the ThermostatGeofencing technology. It syncs with its smartphone app and accordingly lowers the heat when you leave. Moreover, when you approach home after work, shopping, or anything else, it warms up the house to get the right temperature when you walk through the door. This is a great feature, as long as you have your phone with you while leaving and approaching your house.
Features:
- Equipped with ThermostatGeoFencing technology.
- Monitors the weather and daylight and warms up your home from the sunlight
- Saves energy and money
- Works with most HVAC units
- Pristine white appearance to match any decor
- Manufacturers claim that it can save you over 30% on your heating bills
- the Tado app shows you how much do you spend on heating your house per day,in graphic format
The Tado Smart thermostat will cost you almost £199, without installation. Although, if you aren’t ready yet to shell out two hundred pounds, the company lets you to rent one for just £7.99 per month.
5. HONEYWELL LYRIC
At first glance, you might confuse the Honeywell Lyric smart thermostat with the Nest. The design is strangely alike: shiny, round, and with a large data display. Its functionality is also almost similar to the Nest one, though they have some differences too.
Features:
- Includes buttons to bring up a weather forecast, as well as a a button to let the system know you’ll be leaving the house.
- Includes a proximity sensor to take the display from idle to full brightness when you get closer
- GeoFencing technology can be set up to let it know when you’re out of the house
- Works exclusively on proximity
- It can also detect when the last person has left for the day, if you have multiple people.
The Lyric will cost you around £200. Installation is fairly simple as it needs only basic wiring knowledge. You can also have an HVAC professional to take care of the job.Lyric is an Apple partner and works with Apple HomeKit.
For a more robust smart thermostat by Honeywell, you can also check out the EvoHome model.
Final Thoughts
If you are considering buying and installing a smart thermostat in your home why not give us a call and speak to one of our friendly customer service team to book your appointment at a convenient time to suit you.